
Saturation and distortion
Tape saturation vs distortion: choosing the right color
Saturation and distortion both change a waveform nonlinearly. In production, saturation often describes a gentler change in density and tone, while distortion often describes a more obvious effect. The sound and level of the processed phrase are more useful guides than the label.
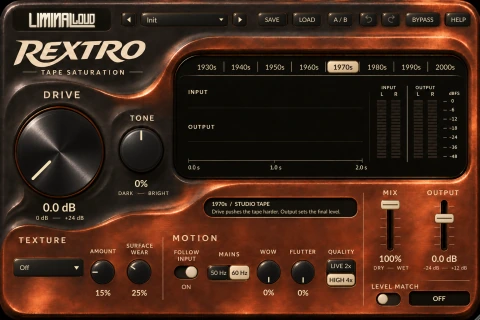
Rextro focuses on tape-era color. Kidamean focuses on psychedelic distortion and movement. Comparing their roles helps you decide whether a track needs a little texture or a sound that becomes part of the arrangement.
Choose a listening target
Loop a phrase containing both an attack and a sustained section. On drums, listen to the snare's front edge and the cymbal tail. On bass, listen to the note's weight and the texture above it. On a vocal, listen to the consonants as well as the sustained vowels.
Pick one problem before turning Drive: a sound that disappears at low volume, an overly clean synth, a rough transition between layers or an intentionally aggressive lead. This gives you something to assess when the processed version gets louder.
Use tape color for a repeatable first pass
- Insert Rextro and choose an era profile. Its eight profiles run from the 1930s through the 2000s. Compare a few using the same phrase.
- Raise Drive gradually. Listen for the point where density turns into a change you do not want.
- Adjust Tone. Judge how the processed sound fits around neighboring parts.
- Set Mix and Output. Compare bypass at a similar listening level, then return to the arrangement.
Bring in texture, wow and flutter after the main tone works. Pitch motion that is attractive on an exposed pad can make a layered bass or a tuned percussion part harder to place. A little movement may be enough when another instrument carries a stable note.
Use distortion as a voice
In Kidamean, choose a distortion voice, increase Mean and listen to the resulting character before adding Trip. Then use Trip to introduce movement. Adjust tone and the dry blend around that moving character.
A simple source makes the effect easier to hear. If the source is already heavily distorted, the new stage may mostly change level and high-frequency density. Try an earlier point in the chain or reduce the processing that feeds it.
Keep one version with movement reduced and another with the full gesture. Listen across several repetitions. An effect can work as a phrase ending while becoming tiring when applied to every note.
Match level before choosing
Added harmonics and changed peaks can make the processed version feel stronger. Reduce the final output for the comparison. Ableton's Saturator reference describes the relationship between incoming level and nonlinear shaping.
Compare in context, then check the exposed track for artifacts you may have missed. Retune the amount after changing the source level: nonlinear processing can react differently when its input changes.
Put the stages in a deliberate order
Processing before a reverb changes what excites the space. Processing after it also affects the tail. Try both orders when the atmosphere is part of the sound, using lower amounts on the first comparison.
If the goal is controlled drum peaks, the clipper-versus-limiter guide covers that separate decision. For stops and backspins, use Whoahjac; tape motion and tape saturation solve different production jobs.